NOTE - you can select 720p in the video bar to make the text clearer.
Introduction
During this exercise, we will focus on adding the necessary import features to an existing worksheet containing a set of General Ledger entries. This will allow the entries to be imported into General Ledger. This process will be divided into two objectives:
- Adding The TSImport Function To An Existing Worksheet
- Importing The Data Into General Ledger
In this exercise we will be utilizing an Excel workbook named GLDepreciationEntries.xlsx. The workbook can be downloaded using the link below:
Download GLDepreciationEntries.xlsx
NOTE - This tutorial example is designed to work with the Timberline Construction Sample Data.
Step 1 - Adding The TSImport Function To An Existing Worksheet
- Open the workbook GLDepreciationEntries.xlsx
- Name the following cells as listed below:
- B4 =
CompanyId - B5 =
AccountingDate - B6 =
JournalId-
- The Name Box is the box that sits above the upper-left corner of the worksheet. Normally, the cell address of the current selection is displayed here. However, a name can be entered in this box to assign a label for a cell or cell range. This label can then be used elsewhere as a cell reference.
-
- B4 =
- In cell G9, enter a formula that combines the Company ID and the Base Account to form the full Account Number on each row.
- Formula Example:
=CompanyId&"-"&A9
- Formula Example:
- Copy the formula from cell G9 down to the remaining rows (G10 through G18).
- Click cell H9, and then click
 Import Wizard on the Office Connector toolbar.
 - For Type Of Import, select GL Transaction Import File and click Next.
- Select the column name check boxes listed below, and then click Next.
- √ Account
- √ AccountingDate
- √ Journal
- √ Reference1
- √ Reference2
- √ Description
- √ Debit
- √ Credit
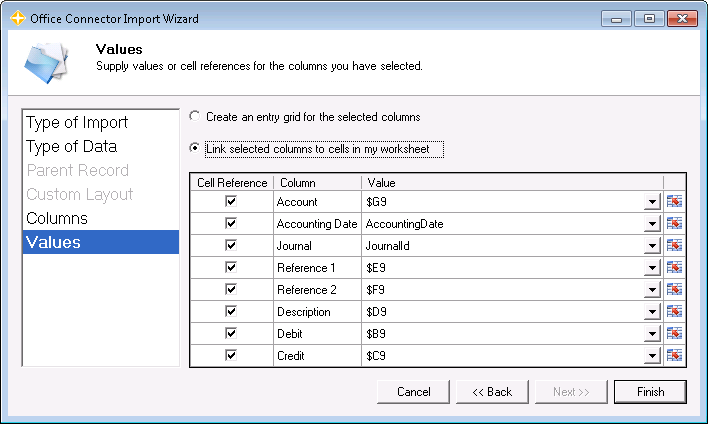
- For Values, select Link Selected Columns To Cells In My Worksheet and enter the related values as shown below:
- √ Account
= $G9 - √ AccountingDate
= AccountingDate - √ Journal
= JournalId - √ Reference1
= $E9 - √ Reference2
= $F9 - √ Description
= $D9 - √ Debit
= $B9 - √ Credit
= $C9-

- Note - For named cells, you can click the drop-down button and select the cell name. For other cells, you can click the cell-selector icon (far right column) to point and click on the desired cell.
-
- √ Account
- Click Finish.
- The resulting formula in cell H9 should look like this:
=TSImport("GLTransaction","","Transaction",ROW($H9),"Account",$G9, "AccountingDate", AccountingDate, "Journal", JournalID, "Reference1", $E9, "Reference2", $F9,"Description",$D9,"Debit",$B9,"Credit",$C9)
- The resulting formula in cell H9 should look like this:
- Copy the formula in cell H9 down to the remaining rows H10 through H18.
Advanced Options
- Columns G and H could be hidden as they would not serve any value to the end user of the solution. This would also prevent the import formula from being modified, thus breaking the import file.
- If you plan to add more rows, the range of data in A8:H18 can be converted to a table. As a table, the formulas in columns G and H will automatically copy down to new rows when added. To do this, select the entire range and then select Insert / Table.
- Consider using Office Connector Query to create simple lists of IDs (Company, Base Account, Journal) that can be used in conjunction with drop-down lists via Excel’s Data Validation feature. Also utilize Data Validation and conditional formatting to ensure data is valid.
NOTE - For more information, please see Exercise 2 - Adding Data Validation To Excel Worksheets covered previously in our knowledge base.
Step 2 - Importing The Data Into General Ledger
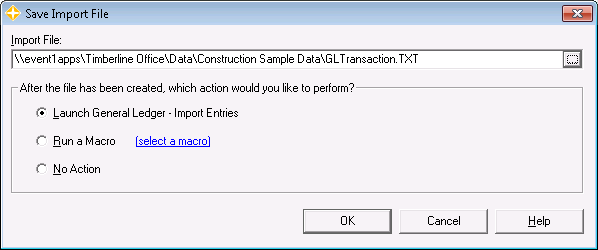
- Click Save Import File on the Office Connector Import toolbar.
- The default save location is sufficient for this example. If it is not already, the first action to be performed after the file has been created should be selected.
NOTE - You can specify the location and name of the import file, and the next action to be taken after the file is created.-

- Click OK to create the file and then launch the Import Transactions window from General Ledger (it may take a few seconds for this window to come up).
- Once the Import Transactions – Print Selection window appears, click the […] ellipses for Import File, select the GLTransaction.TXT file, and click Open.
- Optionally – Click Printer Setup and change where the report will be sent.
- Click Start to import the data.
- Review the General Ledger Import Transactions report when the import has finished.
If you need help with this exercise, or have any questions, you may contact us at:
support.sage300cre-oc@event1software.com