Note - you can select 720p in the video bar to make the text clearer.Introduction
During this exercise, we will address Data Validation in Excel. While Data Validation is not limited to the scope of Office Connector Import, it is a great tool to prevent incorrect data from being entered into the import file. We will focus on Data Validation Lists in this exercise, as well as outlining other methods of Data Validation available in Excel. This process will be divided into four objectives:
- Creating A Data Validation List
- Naming The Data Validation List
- Applying The Data Validation List
- Excel Data Validation Examples
We will be utilizing the Entry Grid created in Exercise 1. If you no longer have a copy, you may download it using the link below:
Download GLEntryGridExample.xlsx
Also, since we will be utilizing Office Connector Query Designer, please make sure you have access to either an evaluation or full license of Office Connector Query Designer. If you need to obtain an evaluation license, please contact your Sage Business Partner or your Sage Customer Account Manager.
This exercise will demonstrate creating a Data Validation List that can be used to select valid Account Numbers from General Ledger in the Entry Grid.
Note - This tutorial example is designed to work with the Timberline Construction Sample Data.Step 1 - Creating A Data Validation List
- Open GLEntryGridExample.xlsx.
- Navigate to Sheet2 of the workbook.
- Click cell A1 and enter:
Chart Of Accounts. - Click cell A3, and click Query Wizard on the Office Connector toolbar.
- On the first step of the wizard, select GL Account and click Next.
- Select the column name check boxes listed below, and then click Next.
- √ Account
- √ Account Title
- Since we will not be applying any conditions or specifying any other options, click Finish.
A list of Account Numbers and Account Titles should now be displayed in Columns A and B, starting on Row 3.
Step 2 - Naming The Data Validation List
- Select the range of cells containing the Account Numbers. This range starts with cell A4 (the first account number) and continues through to the last cell in Column A containing an Account Number.
- Enter
AccountListin the Name Box and press Enter.-
- The Name Box is the box that sits above the upper-left corner of the worksheet. Normally, the cell address of the current selection is displayed here. However, a name can be entered in this box to assign a label for a cell or cell range. This label can then be used elsewhere as a cell reference.
-
Step 3 - Applying The Data Validation List
- Navigate to Sheet1 and click the cell located in the first data entry row of Column A.
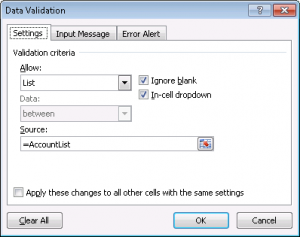
- Select Data Validation on the Data tab.
- In the Allow box, select List.
- In the Source box, enter:
=AccountList- Note - This is the label assigned in the previous section to the range containing the Account Numbers.
-
- Click OK to complete the Data Validation.
- Note - Since the entry grid was created as an Excel Table, the Data Validation settings that were applied to the first row are automatically copied down to any new rows that are added as data is entered.
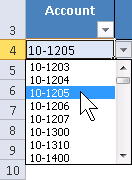
Notice that there is now a drop-down arrow in the data entry cells of Column A. When clicked, a list will appear containing Account Numbers that can then be chosen:
Excel Data Validation Examples
- Limit the length of a text value.
- In cells that should contain dates, limit the input so that only dates can be entered. Also, control the range of dates that can be used.
- In cells that should contain numbers, limit the input so that only numeric values can be entered. Also, control the range of values that can be used.
- Use custom validation by writing an Excel formula that returns TRUE (if the data is valid) and FALSE if it is not.
- Control the messages that a user will see when the selection is in a given cell or when an invalid value is entered.
- A complete list of Data Validation descriptions and examples can be found on Microsoft's website using the link below:
- Data Validation Descriptions And Examples
If you need help with this exercise, or have any questions, you may contact us at support.sage300cre-oc@event1software.com